
The d-voting project from the DEDIS lab at EPFL is a decentralized voting system that leverages blockchain technology and cryptographic algorithms to ensure secure, transparent, and verifiable elections. By using a blockchain as the storage medium, the system allows multiple entities to oversee the election process and enables easy access for public verifiers to ensure the integrity of the election.
This article provides an in-depth overview of the d-voting system, covering the installation of the frontend and nodes, the role of the Dela blockchain, the trust model using a proxy, and the process of running an election. It also delves into the cryptographic techniques employed to secure the election, such as distributed key generation, shuffling, and decryption of ballots, and discusses the challenges and solutions implemented in the d-voting system.
Overview
The d-voting project from the DEDIS lab is largely based on the cryptographic algorithms used in the Helios [1] project, but uses a blockchain as the storage. This allows for multiple entities to oversee the election process, as well as an easy access for public verifiers to make sure everything happened correctly.
From a system point of view, the following steps are necessary for an election:
- Installing the frontend and the nodes
- Dela nodes
- The frontend and the backend
- Running an election
- Setting up
- Casting a ballot
- Finalizing an election
- Securing using cryptography
- Calculating the results of the election
- Conclusion
We’ll go through these point-by-point and present the challenges and how they were met by the d-voting system.
Installing the Frontend and the Nodes
For an overview of the system, please have a look at the following figure:
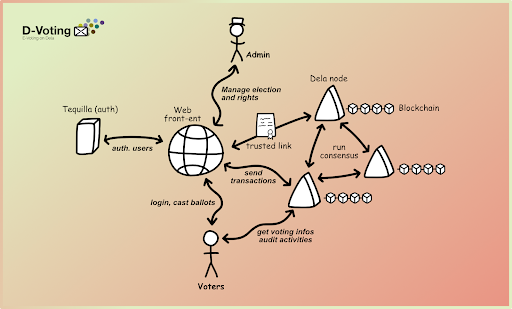 |
| Figure 1 – overview of the d-voting system |
In it you can see the main parts of the system. The backend is composed of several nodes. Each node is handled by an independent entity to avoid collusion between the nodes. They store every step of the elections in the Dela blockchain, and also perform the cryptographic calculations necessary to get the result.
Between the nodes and the voters is the Web-frontend, which serves the webpage shown to users and admins. The frontend is also needed to forward the authentication of users to the Dela nodes.
Dela Nodes
The Dela Blockchain
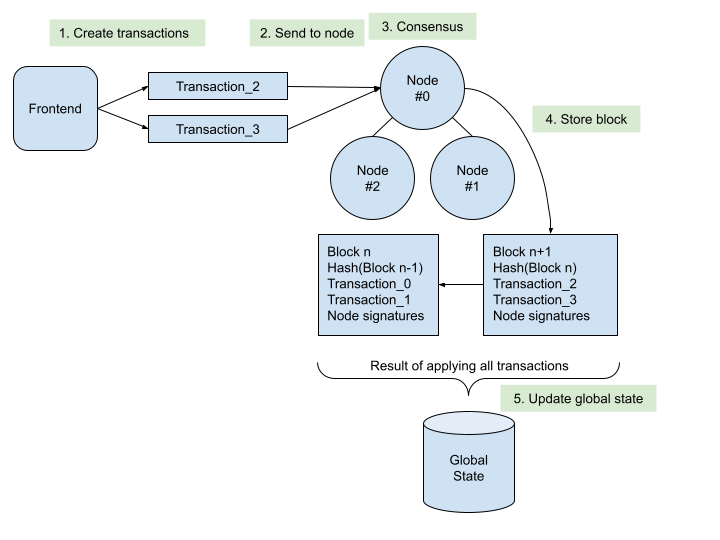 |
| Figure 2: Nodes, transactions, blocks, and the global state. |
The above figure shows an overview how the Dela blockchain works, and simplified most other layer-1 blockchains. The client, here the frontend, sends one or more transactions to one of the nodes. This node contacts the other nodes and tries to create a consensus on the validity of the transactions. If the consensus is reached, a new block is created and added to the existing blocks in a chain. At the same time, the global state is updated with the modifications requested in the transactions.
Like Ethereum [4], Dela uses an account-model, which is similar to a key/value database. For blockchains, this database is called the global state. Every transaction requests to update one or more values of the global state. The nodes create a consensus on the valid and invalid transactions and store this consensus, together with the transactions, in the blocks. A minimum of four nodes are needed to provide byzantine fault tolerance (BFT) [2], which includes every error starting with nodes being down to nodes trying actively to disturb the election.
Contrary to Bitcoin, where a new block is created in a random lottery called Proof of Work [5], the Dela blockchain has an authorized list of valid nodes. These nodes elect a leader, which proposes new blocks containing the valid transactions. As soon as enough other nodes confirm the validity with their signature, the leader includes the block in the chain.
One recurring problem in blockchains is how to prove that your transaction is part of the blockchain now. In Bitcoin or Ethereum, a client wanting to be sure of the validity of the transaction, needs to download all blocks ever created. The Dela blockchain is based on Skipchains [3], a novel blockchain architecture developed in the DEDIS lab. Skipchains solve this problem by providing signed links to newer blocks. The previous implementation allowed a client to trust the latest block by downloading only a small subset of the total blocks. In our example, it needed 25 blocks out of 500’000 blocks, which took less than a second.
Trust Model using a Proxy
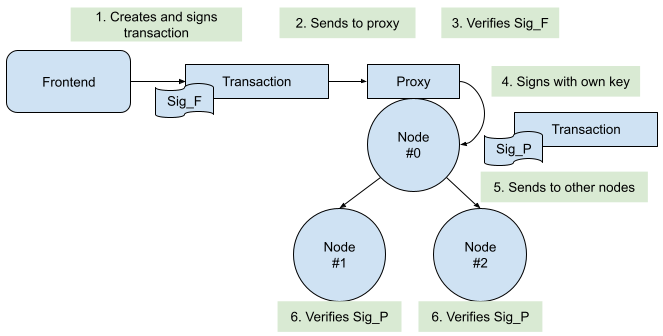 |
| Figure 3: Signatures in the system |
The Dela nodes have two open ports to communicate with the network: the first port is used for node-to-node communication, while the second port is handled by the dela-proxy. In the current setup, every communication with any of the ports goes through a traefik proxy which handles the TLS termination. This enables trust when connecting to (another) node.
The dela-proxy port is used for connections from clients, like the web-frontend. Only valid requests are forwarded by the dela-proxy to the other nodes through the node-to-node port. To authenticate against the proxy, the web frontend has a keypair, and its public key is handed to the proxies. So only requests signed by the web frontend are handed to the other nodes.
The Dela blockchain has an account-based model and pre-defined smart contracts. One of these smart contracts is the “access” contract which defines who is allowed to add new transactions, and for which contract. In the current setup, this access contract has the public keys of all dela-proxies in the system. This means that every dela-proxy has the right to send transactions for the d-voting contract to be included in the next block.
When the leader of the Dela blockchain receives a transaction, it verifies the signature against the “access” contract. If the signature passes, the leader proposes a new block with the transaction included. There may be more than one transaction waiting for the inclusion in a block.
The last step is to send the new block proposition to the other nodes, which will verify the signatures and the content of the included transactions and sign the block if they are OK with its content. Once enough nodes sign a new block, it is included in all nodes and is part of the blockchain.
The Frontend and Backend
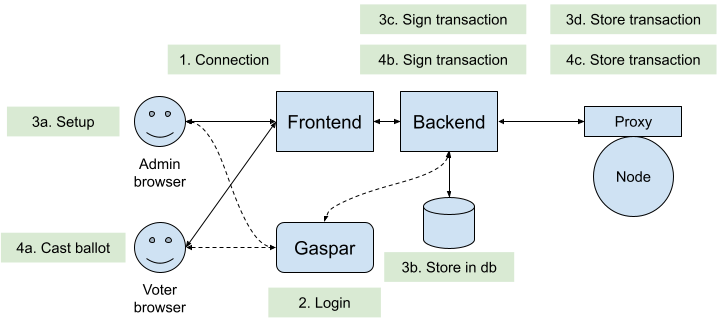 |
| Figure 4: Frontend and the dela-proxy |
Between the clients and the dela-proxy we find two parts: the frontend and the backend. The frontend serves the webpage for the admins and the voters, while the backend handles interactions with the dela proxy.
The webpage is written in React [6] and allows the admins to set up a new election, close an ongoing election, and present the results. The voters can use the webpage to cast their ballot and to see the results, once the election has been terminated.
The backend handles the login of the clients using the EPFL Gaspar [7] authentication. It also has a database which stores the authorizations of the different users. This part is being rewritten in a student project in Spring 2024 and will be handled by the d-voting contract itself in the future. Finally, the backend also handles the signing of the transactions before sending them to the dela-proxy.
(De)centralized Authentication
In a fully decentralized system, each user is responsible for its own identity, e.g., using a Self Sovereign Identity. Unfortunately we don’t have this possibility at EPFL and must revert to a centralized authentication. This inserts a single point of failure to a system being meant to work in a decentralized manner: in the above figure, you can see that the backend does the signing of the transactions, which means it must be hardened to avoid malicious signing of random transactions.
We did this by peer-reviewing the code and being strict about who has access to the backend, in order to avoid any malicious influence from a third party.
Another possibility would be to authenticate the user against each dela-proxy, and then to rely on a super-majority of dela-proxies to collectively sign the transaction. Unfortunately the EPFL authentication doesn’t support this directly, so the user would have to log in once for each dela-proxy, which would lead to a very bad user experience.
Running an Election
Setting up
Once the nodes are installed and the front- and back-end are set up, an admin can start an election. Admins are chosen during installation of the backend by their SCIPER-ID, which is their EPFL-internal number.
An admin can create a new election, which is called a form, and choose which type of election they want to start: either a classic n-out-of-m election, an election with ordering of candidates, or a free-answer form. The UI allows adding URLs for each entry, for example to add a link to candidates’ web-pages. The admin can also add different languages, for the EPFL election the choices are offered in English, French, and German.
Next, the admin needs to add the SCIPER-IDs of the voters. Not all elections are available to all voters. Voters can vote multiple times, but only the last ballot will be counted. In Figure 4 you can see the database attached to the backend where the voter-IDs are stored. There is an ongoing project to put this data also on the blockchain, so that the system doesn’t have to trust the backend when authorizing a voter to cast a ballot.
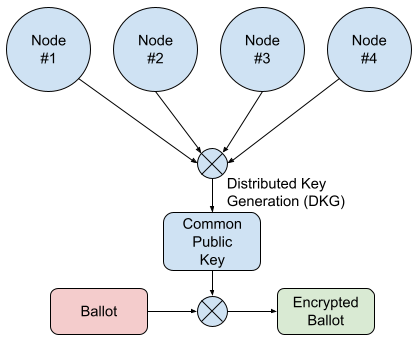 |
| Figure 5: Creation and use of the Common Public Key |
As a final step, the election needs to be opened. During this step, an important part of the cryptographic algorithm takes place: distributed key generation (DKG), as seen in the above figure. During this process, every node chooses a secret key, and shares the corresponding public key with the other nodes. Using an algorithm called Pedersen Commitment, the system calculates a threshold-secured Common Public Key. This public key has very important properties:
- it can be used to encrypt the ballots
- the corresponding private key is not known, so nobody can decrypt the ballots on their own
In order to decrypt the ballots, the system first has to go through a step called shuffling, which will be explained later. Only once the ballots are anonymized through shuffling will the nodes accept to decrypt these anonymized ballots.
Casting a ballot
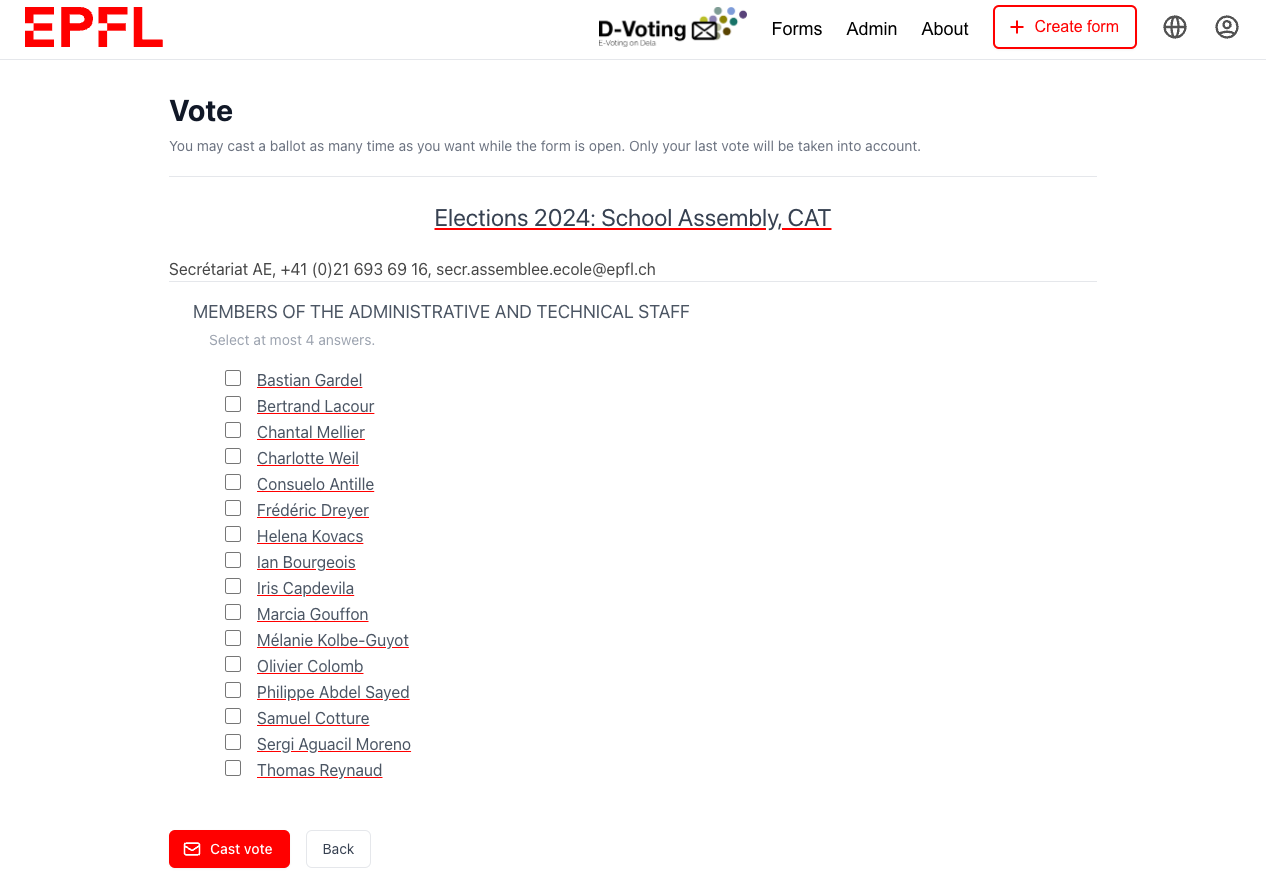
For the School Assembly 2024 election, this is the view of the candidates. In order to cast a ballot, the user has to select zero to four candidates and click “Cast vote”. The browser of the user will now encrypt the votes using the Common Public Key. As nobody holds the corresponding private key, this ballot is now secure and is sent to the backend.
The backend adds the SCIPER-ID to the ballot and sends it to the dela-proxy for inclusion in the blockchain. Now the ballot awaits the closing of the election.
Finalizing an election
Securing using cryptography
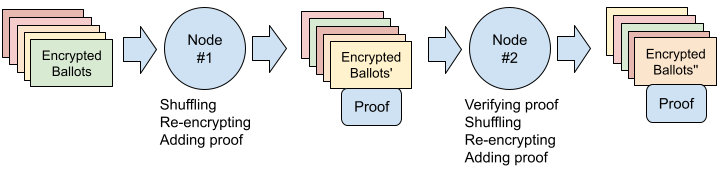 |
| Figure 6: Shuffling and re-encrypting ballots |
As described earlier, all ballots are encrypted using the Common Public Key. Before the nodes allow decryption of the ballots, they need to be anonymized. This is done using shuffling [9], as shown in figure 6. In this process, the first node proceeds to:
- take all existing ballots and remove multiple cast ballots
- remove the SCIPER-ID from the ballot
- re-order the ballots
- re-encrypt the ballots
- create a cryptographic proof that all has been done correctly
All following nodes do the same, except for the first step, where each following node does:
- take the shuffled ballots from the previous node
- verify the cryptographic proof
Once every node shuffled all the ballots, the probability of finding the original ballots and the corresponding SCIPER-IDs is negligible.
Calculating the results of the election
Now that all the ballots are anonymized by stripping their SCIPER-IDs, changed in order by shuffling, and unrecognizable through re-encryption, the final step can happen. The DKG from the previous step allows decryption of the ballots, but only if all shuffling steps are correctly done. Because a majority of nodes is needed for the decryption, an attacker would need to also control a majority of nodes in order to cheat and circumvent the shuffling.
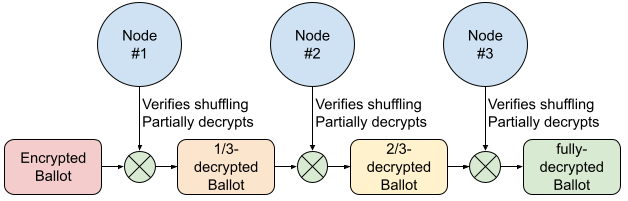 |
| Figure 7: Verifying shuffling and decrypting the ballots |
As can be seen in figure 7, a majority of nodes need to agree to decrypt the ballots. This is done in a step-by-step fashion, where each node verifies the correct shuffling, and then participates in the decryption. It is important to notice that the decryption will fail if there is no majority of nodes accepting the shuffling. Also, the private key corresponding to the Common Public Key is never calculated. This means that the original ballots can never be decrypted, and the vote secrecy is kept.
Conclusion
All these steps are necessary to allow for a trustworthy election where the secrecy of the votes is kept, even if an attacker tries to subvert the election. The current system still has one single point of failure due to the fact that we rely on the EPFL Gaspar login. But once the nodes are distributed over multiple actors at EPFL, any malfunction of this single point of failure can be detected by any one of the actors.
The public blockchain allows additional verification by external actors to make sure that the election and the counting of votes has been done correctly.
It is noteworthy to mention that the upcoming Swiss Post e-voting system [10] has similar security guarantees. They also rely on a DKG which allows for encrypting the ballots. After the election, their system also shuffles the ballots, before they are decrypted.
One big attack vector that this system does not protect against are upcoming big, general quantum computers [11]. If one day such computers exist, they will be able to re-create the private key corresponding to the Common Public Key, and thus decrypt all ballots.
Links
- Helios
- Byzantine Fault Tolerance (BFT)
- Skipchains
- Ethereum
- Proof of Work
- React
- Gaspar
- Distributed Key Generation (DKG) – Wikipedia – Paper
- Shuffling – Paper – DEDIS project paper
- Swiss Post e-voting
- Quantum computers